Tagged: aws
Creating virtual products on the virtual cloud – Amazon RenderFarm
When we first started talking about what the web based Blank Label experience was going to be like my concern was the visual quality of the product our customers were going to see in the shirt designer. Blank Label allows you to create several thousands of custom shirt design combinations; building a physical product per combination to take a photograph would have been very very very expensive.
Not being able to physically touch the product, and not be able to feel the cloth and not have a good visual of what the product would look like was something were a lot of “not’s” that I was not okay with… so not known anything about 3d modeling nor shirts, I decided to take on the challenge of figuring out how we could come up with a modeling technology that would yield a somewhat realistic shirt… after all, anyone can easily tell a real shirt from a rendered shirt…. right?
The first mistake I made was try to find a company that could create what I needed – there were many; and once I explained the idea behind how I wanted it to work and render, the cost went from $14k to $48k to … over a $100k… yes I know its not cheap to render and design a model, but just because they couldn’t figure out how to automate actions and export clippings (I wont go into details) it did not mean that the client should foot the bill…. anyway., the second mistake I made…. which was the right one… was that I hired a 3d modeler (overseas) to work with me and understand what I was trying to create…. I did not learn much about 3d modeling, but I did learn more than I will every want to about a shirt during this time…. anyway, lets look at what we created back in the day.
Version 1 (2009)
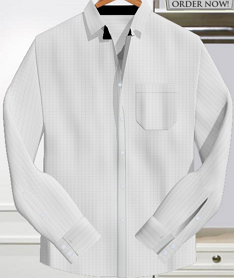
Version 1; wasn’t that bad… but it also wasn’t that good. It did a decent job of showing your fabrics and other selections, but the realism was lost., so fast forward several months we came out with version 2 with a different 3d modeler, and again several months after than version 3 with another modeler., (both below)
Version 2 (2010)

version 3 (2011)
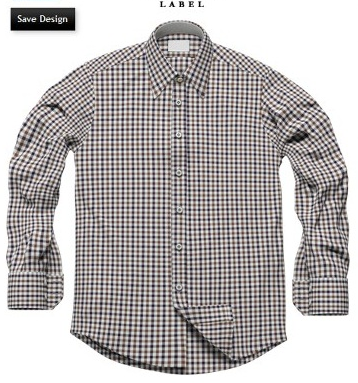
The problem with each (besides it not being realistic enough) was that the modelers themselves did not understand the anatomy of the shirt; and because they didn’t, they couldn’t create a model that behaved like a real shirt. On top of that, they didnt really understand the need and desire behind having things done a certain way because they had never worked on a model that was controlled by code…. at some point we needed to add more features to the shirt, and also, since each modeler we had been through, had a non-automated way of generating renders., it would take weeks if not months to get 10-15 fabrics rendered…. so I went back to the design board, and looked hard…
By now I had some understanding of how the models work, and how things needed to be created., and fortunately for me I found someone who was willing to understand the shirt, and understand the entire process behind what I was trying to do., The best part about this was that he said “I don’t know if i can do this, I have never done this, I don’t know if it will work, but if you trust me and can be patient, I can give it my best shot”
See the image below, they are both zoom shots
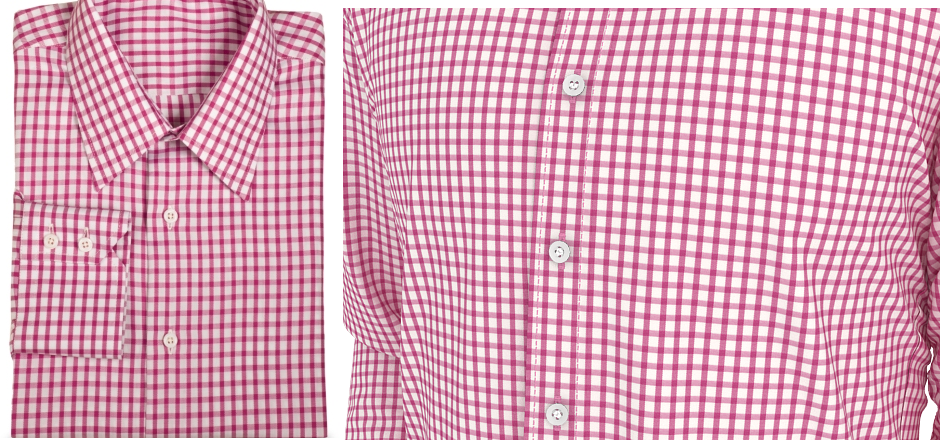 In this image, the one on the left is a picture of a real shirt; the one on the right is a rendered zoom shot of the chest area
below is version 4 (current: 2012) of the shirt
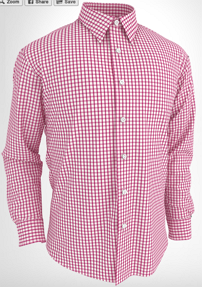
With version 4; we have achieved enough realism. There was a lot of attention to detail, both he and I understood every single part of the shirt; how its stitched, how the layers go on each other, etc… and the model we have now., is not just realistic-ish., its also automated… if you head over to Blank Label you will see that there are several rendered views/zooms of the shirt.. which finally brings me to the topic of this post.
We use to render the model on his machines, he had a small network of 3 machines, a decent amount of CPU power, and he would spit out 5 fabrics rendered(each is 86 frames) each day; approx 1.5-2 hours per render. Not that bad… but for us, when we launch new fabric selections, we usually launch 30+ at a time; which means 2 weeks to get those rendered and that is if he isn’t busy rendering other stuff….
We looked at render farms that are out there…. way to over priced and you have to hand over your files… your intellectual property to a third party.. who wants to do that? so we thought that we would give Amazon (AWS) cloud a try…. in theory it sounds great, and there are a few articles out there on how to accomplish it, but they are based on theory…
The best part is that I had no idea what I was doing and it was going to be a challenge to figure it out…after going through the motions and having burnt 20 hours; I can confirm that it works, but it takes time and patience.
To build our renderfarm on amazon AWS using only EC2’s; I simply took a windows 2008 r2 AMI and started configuring it, installing the trial version of 3d studio max and setting it up. Once it was setup, we had the issue of “Who would be the manager”… we decided that it made most sense to have the 3d modeler be the manager so we opened up ports through his firewall into his machine, and viola, the render server connected to his machine and was ready to accept work…. there was just one issue., the files on his machine mapped to a UNC path that did not exist on Amazon…. in hindsight, I would have had him fix it a different way, but we ended up mapping everything to drive Z (took several hours to remap) and once remapped, we used google drive to sync between the amazon cloud instance and his machine; once synced, the server started doing work and started spitting out renders….
Great… but that’s just 1 machine though…
Once the first machine worked, it was pretty challenging to setup a repeatable image; i.e. an image that you could just start, and it would automatically connect to the manager and start doing work. Its not as easy as it sounds, there are permissions that need to be setup, things that need to run as a service, virtual folder to drive mappings that need to be created and the hardest of all, ensure that they connect to the manager. 🙂
I will definitely dedicate a post to walk through an amazon render-farm setup; but I will leave you with this.
What use to take 1.5 – 2.0 hours per fabric, now takes 15-20 minutes with 7 virtual machines; up that to 14 machines and your time decreases by 1/2.
This render-farm allows us to create our virtual products much quicker, virtually on the cloud.
MVC3 .Net Continuous Integration and Deployment in the cloud – Part I
This post builds on my previous post.
The task of getting a MVC3 .Net solution to build in the cloud was not as straight forward as I thought it would be. As I hit roadblocks I googled, and as I googled, I realized that there were many who were trying to do the same and had hit the same roadblocks with no success.
So how does one do CI and deployment in the cloud? Usually people will have a build server somewhere running jenkins, cruise control, hudson, team city… or something else… I wanted to get away from that. I also no longer wanted to manually copy files to the server.. even though that hardly took any time.
Since we already use a few of the Atlassian ondemand products; using Bamboo for automation sounded like a great idea; to use Bamboo for automation, you will also need an Amazon AWS account. The great news is that currently Amazon has a free program for new customers; the not-so-great news is that we cannot completely use the free program because Bamboos elastic agent performs slow and cpu hits 100%… but there is some benefit in being part of this program… so sign up as it offsets some of your costs.
Once you sign up for Amazon Web Services; you need to obtain a few things from the security panel.
1. Get your Access Key pair

2. create/get your certs

Once you have those two things; head on over to the Bamboo administration and configure your elastic bamboo
You will need to enter your AWS Access Key, I changed the shutdown delay to 100, and I opted to enable “Upload AWS account identifiers to new elastic instances.” I don’t think this is actually needed for windows systems (doesn’t work)., but the thought here was that you could start an elastic instance and have it “mount” a specific elastic volume…. this does not work in bamboo for windows systems., but whatever, if you look at the image, you will need to select “files will be uploaded from your PC” and then you can upload your cert key pair; it then uploads and saved it for you. I also opted for Automatic Elastic Instance management, and sent it to passive.. You can change these values if you will be doing a lot more builds; but for starting out and getting things going, the minimum is just fine.

Once that’s done, save the settings; you will then want to view/edit the Image Configuration.
In the image below, you will see that I disabled all the default images and have just one configuration enabled, my own image that I will show you how to create/obtain and get to in Part II; focus on the Default Image EBS x86_64 (windows) stock image, it will be enabled for you by default (this is fine for now). Also notice that the Instance type is set to Large. If you would rather not spend $’s in the setup/configuration you may want to change this to Micro (it will be slower) and its free under the AWS free program.

To change it to Micro, all you have to do is click the Edit link and you can change the value (image below)

Once this is all done; if you just want to check things out and see that they work, you can click on the start instance link in the “instances” page.

Once you click start, head on over to the AWS panel and select “instances“. In the image below, you will see that it displayed an instance, and if you right click, you will have an option to connect, click it

Once you click connect, you will get a popup that allows you to download a shortcut file to remote desktop to this machine; the username is administrator……

So what about the password? how do you get that? clicking the link wont help. for that., you need to head back to bamboo instance management.
The image below shows what you should be seeing, an instance name, and an elastic agent starting or started. Click the instance name

Once you click that, you will get a page that displays the details on the instance; see the image below, the password will be visible in this area, and you can use this to login. Once you are done messing around, you should terminate all instances (esp if you are not using free + micro), you can do that from the instance administration page…
If you try to use this default image as is and configure your build scripts with MS Build, things will not work, MVC3 is missing, a lot of windows updates are missing, nant doesn’t work correctly, and you will want some ftp tool + scripts on there… basically you will want to correct all this, and take a snapshot of the instance (this gives you your custom instance that is updated)…..
